Thursday, 10 March 2016

Back to Life, Back to ......a Backlog o.O

Back to Korea, back to work, back to......painting :D and back to being behind on updating this blog - so everything is back to the usual then.
After getting back from Ireland I had about 10 days of Feb left and a load of stuff to get done. Once I got back I decided I really needed to take stick and list out all the stuff I have waiting for paint and staring furiously at me from the shelf and cabinet. Here is said 'list of shame' (incl the stuff I bought while I was on hols)


On the bench:

V̶o̶x̶h̶a̶i̶l̶e̶r̶ ̶S̶e̶r̶v̶o̶ ̶S̶k̶u̶l̶l̶ ̶(̶T̶B̶B̶)̶ ̶ Done
Yeld Rig Hive Spyer (primed)
T̶a̶n̶i̶t̶h̶ ̶S̶n̶i̶p̶e̶r̶ ̶&̶ ̶D̶i̶o̶ ̶B̶a̶s̶e̶ ̶(̶h̶a̶i̶r̶,̶ ̶s̶k̶i̶n̶,̶ ̶h̶i̶g̶h̶l̶i̶g̶h̶t̶s̶,̶ ̶d̶i̶o̶ ̶p̶r̶i̶m̶e̶d̶)̶ ̶ Done
F̶e̶m̶a̶l̶e̶ ̶C̶o̶m̶m̶i̶s̶a̶r̶ ̶(̶h̶a̶i̶r̶ ̶&̶ ̶d̶e̶t̶a̶i̶l̶i̶n̶g̶)̶ Done
I̶n̶f̶i̶n̶i̶t̶y̶ ̶C̶h̶i̶m̶e̶r̶a̶ ̶(̶d̶e̶t̶a̶i̶l̶i̶n̶g̶)̶ Done
Harlie Shadowseer (boxed)
Harlie Troupers (2) (basecoated and shading)
V̶r̶o̶s̶h̶ ̶T̶a̶t̶t̶e̶r̶s̶o̶u̶l̶ ̶(̶f̶i̶n̶a̶l̶ ̶d̶e̶t̶a̶i̶l̶s̶,̶ ̶b̶a̶s̶e̶)̶ Done
B̶l̶o̶o̶d̶ ̶A̶n̶g̶e̶l̶ ̶S̶g̶t̶ ̶(̶f̶i̶n̶a̶l̶ ̶d̶e̶t̶a̶i̶l̶s̶,̶ ̶b̶a̶s̶e̶)̶ Done
Librarian Turmiel (highlights, detailing, base)
Kranon the Relentless (primed)
Gaunt's Ghosts (5) (boxed)
Ruststalkers (5) (primed)
Skit Rangers (10) (primed)
Tech Priest (boxed)
Inquistor (boxed)
Psyker (boxed)
Swordbearer (boxed)
Herald (boxed)

In The Cabinet:

The Nurse (boxed)
Mortician's Guild 'Ghast' (boxed)
Mortician's Guild 'Silence' (boxed)
Possesssed CSM (5) (boxed)
Thanatar Automata (boxed)
CSM Sorcerer Lord (boxed)
Chaos Familiar (boxed)
Callidus Assassin (boxed)
Vindicare Assassin (boxed)
Eversor Assassin (boxed)
Culuxus Assassin (boxed)
Chaos Cultists with autoguns (10) boxed)
Space Hulk Terminators (12) (boxed)
Space Hulk Genestalers (18) (boxed)
Doors (20) (boxed)
Eldar Wave Serpent (boxed)


Oh God - there's a lot! Nowhere near as much as some foilk I know but still.......How does this stuff accumulate so sneakily!!! Bugger! So - no more buying until I've got this lot shifted.....at leas the majority of it. Thanks to Az's monthly targeting thread over on Dakka, it's become easier to set and see monthly goals of what I want to get completed.
I didnt have much time when I got back so Feb's goals were quite small but as 3 of them were 'commissions' for other folk, they were on top of the list.


First up was BC's 2 figs. One, 'Gaunt's Ghosts' lasman. I'd talked to BC about this and said I wanted to 1) make him a sniper and 2) was going to make a little vignette for him of the farmhouse on Aexe Cardinal from the book 'Straight Silver'. This was all built and ready for paint before I left for Ireland so just needed paint once back. I have loved designing, building and painting this from start to finish and am absolutely thrilled with the finsihed work. Was also pretty gutted to have to parcel it up and send it off to its rightful owner. So I made sure to photo the shit out of him before sending him off. So happy with this guy :) The ruined farmhouse is totally scratch built and the vines ggrowing up the outside are actually the roots of one of my (dead) tomato plants dried out! Damn happy :D I will eventually be doing little vignettes for the 5 Gaunt's Ghosts figs that BC gave me.


Tanith Sniper - Farmhouse Siege: Aexe Cardinal
Second fig for the same peson was a female Commissar fig that they wanted done in naval colours than the usual black-coated Comms. So I went for one of my fav colours, which I usually use as the secondary colour in my AdMech scheme. Think she came out rather well. Not the most handsome of sculpts but a pretty important piece for the owner.


Naval Commissar
With those two taken care of, it was on to finishing up the other 'commission' from the 'I paint your mini' thread over on Dakka. This one is an Infinity fig and was my first time painting anything from Corvus Belli and will possibly (but probably not) be the last time I bother with anything from that company until they sort out their casting/boxed product process. It's 28mm but feels more like 28mmicro. They cast in metal rather than resin or plastic and usually (see the above Ghost) painting a bit of metal again is quite fun. Metal does have a lovely weighty feel to it. This Infinity cast tho was an utter pain in the nuts. The joins/fits between parts are not slotted particularly well so the joins are going to be weaker than if they had bother to use proper peg and slots. As its such a slight slender fig, pinning is nigh on impossible. The vents were in a few places very hard to differenciate from the actual sculpt. This Chimera fig is a very nice miniature but their casting and how you get the fig really looks so amateurish, especially from what is supposed to be a big game and minitures company. A quick and simple comparision show you what I mean. As a comparison fig, I used the Ghast fig I got in Ireland by Steamforged Games. Both are totally fresh out of the box - no clean up or trimming done on either.
Infinity - Chimera
Mortician's Guild - 'Ghast'


Big fething difference. Anyhow - Finally got her painted up. Tried out using glazing a lot more with her as she is so small and delicate and so is a lot of her detail. Anything more than just glazes would be in danger of obscuring some of her finer detail. And finished piece........


Infinity - 'Chimera'
Overall, I'm very happy with how she came out. Her scheme was semi-worked out before I started but did change and adapt somewhat as I went along, especially the metals.


So, with those done - time to get some of my own stuff done. I had and still have I suppose, a couple of figs on my bench that I started but never got around to finishing. So was defintely time to get a lest some of them all finished up.


A little bit of kitbashing/scratch building and the 'Vox Divina' servo skull was born! Simple enough paintjob and I had my entry for Para's Feb painting comp over on Dakka


Next up was the first of the Blood Angels' terminators from the Space Hulk box - Sgt. Lorenzo.
Space Hulk - Sgt. Lorenzo, Blood Angels Terminator

Space Hulk - Sgt. Lorenzo, Blood Angels Terminator

Space Hulk - Sgt. Lorenzo, Blood Angels Terminator

Space Hulk - Sgt. Lorenzo, Blood Angels Terminator


His pauldrons are obv more Flesh Tearers than Blood Angels because........reasons! Actually I went with the black pauldrons and a darker richer red for the armour to try and break up the usual BA scheme whcih tbh I really find quite boring. I cut off the weird moulded stand/base that the Space Hulk figs come on and rebased him on one of the bases I ordered for Fenris Games in the UK. Big improvement I think.

Finally (god this is a long post already) I got Vrosh Tattersoul completed. He's been sitting there 90% finished for months, so he's finally done and joined up with the other Chosen in the cabinet


Dark Vengenace - Vrosh Tattersoul
And that bascially was February hobbywise. On a final note of what is already a seriously TL:DR post, I gonna 'quickly' talk about a gorgeous new release.


Now, after failing pathetically in Ireland to stick to my buying freeze of figs .....I'm renewed on that mark and totally committed to a renewed buy freeze until I clear my backlog...........and then what does GW do.......they release bloody Deathwatch:Overkill......you utter shitlords!!!! If you havent seen/heard of GW's latest boxed set/board gmae release....crawl the fuck out from under that rock and have a look. They have finaly decided to redo/rerelease/reincarnate/re-whatever the genestealer cult from way back when and damn but they have seriously not held back on it. No half-assed meh sculpts here. They have brought a fething rocketlauncher to a knife fight on this one.
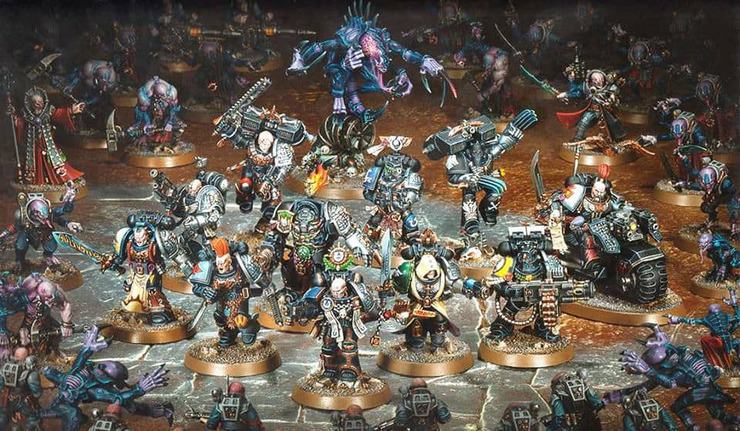


Sculpts are stunning and the game itself look really quite playable. No major gripes from me....one or two possible niggles though. There doesnt seem to be any sort of facing/LoS rules for shooting. On the game board's tiles there are no real hard blind corners or doorways for cover but you do seem to be able to shoot targets directly behind you and striaght through other figs without any sort of penalty. That I really don't like. Houserule #1 is def gonna be made to cut that nonsense out.


The art is glorious overall except for the Deathwatch stat cards. Some genius decided to use the same paictures of the different DW marines from the short stories which are quite possibly the shittiest, ugliest most bollox pieces of art GW have ever used (ok ok....enjoy a touch of hyperbole here) - not onlky are they ghastly but they really don't gel with the style and aesthetic of the rest of the artwork. This however is just my opinion and I'm sure there are folk out there who do really like the portraits.


So niggle #2 is purely subjective and niggle #3 is even more petty!! That fething Space Wolf. Now it's no real secret that I absolutely bloody detest the SWs. Space Marines are cracking. Vikings are awesome too. Space Wolves are not. They're twats. I don't like their fluff, their chartacters, their aesthetic and they totally get on my tits. Having one in the Deathwatch - totally fine with that. Makes no sense to have one of the most prolific chapters NOT contributing. However (if you've also read the short story about) Drenn Redballs is an ever bigger twat than usual. From the first page he comes across and a seriously unlikeable wanker. A complete twat. The scuptors have done a fine job if showing his arseholish character with that bollox mohawk they've given him on the fig. Fluff character being an arse or not - I really don't like that horse-wank of a hairpiece they've given him. I doubt I'll keep it when I 'eventually' pick up a copy of the box. I'll probaly either replace his head with a p̶u̶m̶p̶k̶i̶n̶  a Mk VII helm or if I find one cheaply, one of the SW wolf helms - we'll see. Having ol Redballs wearing a helm though does go directly against the fluff as it says he refuses to wear one......but as the fluff character is a complete arsetard......I'm quite happy to break fluff this time. Again folks, don't take my anti-SW ranting too seriously (read: at all) - I just really can't stand them - I'm sure there are some nice SWs out there (n̶o̶,̶ ̶n̶o̶ ̶t̶h̶e̶r̶e̶ ̶a̶r̶e̶n̶'̶t̶;̶ ̶a̶r̶s̶e̶h̶o̶l̶e̶s̶ ̶o̶n̶e̶ ̶a̶n̶d̶ ̶a̶l̶l̶!̶!̶!̶ ) Anyways - those 2 petty niggles and that one LoS rule worry aside......this could very well be one of GWs best boxed games releases at least since Space Hulk. Is it better than BaC?......hmmm - I'm not really in any position to say. BaC doesn't really appeal to me as it's 30K and I've really got no interest in starting 30K. I would say on a sculpt level, the DW:O are better and more detailed. Gamewise......as I say, I can't really comment. Anyhow...that's your lot for today folks. Sorry for the length but I'm a bit behind the now and that.


Till again - take it easy, C&C always welcome and if you're not licking your brush, you're not loving your brush  ;)

Saturday, 6 February 2016

New Year's Resolution My Arse!!


Back home in Ireland at the mo so no hobbying. So nice being home but of course just can't leave hobby well enough alone lol. Anywho - I had made a list of resolutions at the new year for hobby, the first of which being that I wasn't going to buy any more figs until I'd cleared all the stuff I already have, which to be fair is not nearly as much as a lot of folk - no plascrack hoarding in my house!! There were to be 2 exceptions - a box of ruststalkers for my AdMech and FW's new primarch release - Corax. Decided not to get Corax yet and as I'm starting to branch out and do some other stuff besides GW/FW my mind turned back to 'The Asylum'. (You check it out here - http://www.edouardguitonasylum.com/) There was an awesome KS by Thirdman Studios to get a group of 54mm boutique figs released and they are/were gorgeous. Sadly, said KS failed to get funded. The sculpts are gorgeous and come from the twisted mind of Edouard Guiton and were sculpted by Alexandre Aragon Marks. The model that orginally really caught my eye was 'The Nurse', painted by the super talented Martin Grandbarbe. 


So different to what I usually do but totally fell in love with it and was so dissappointed that the KS failed. They did do a limited (300) release of her before the KS but when I looked - all sold out. Then I heard that there were still some available over on CMON. Sweet! LLS, ordered myself one up the other night - $40...seriously though for a beautiful (and from what I've read from folk who got them the cast is near perfect) 54mm boutique....thank you very kamsa :D So that's in the post. Seriously need to up my skin painting game though before I take that on. Study study time.


Now that would have been all well and dandy if I hadn't gone up to Dublin shopping for some GS today...........needless to say - Resolution #1 is out the proverbial window!!


LMAO

Thursday, 4 February 2016

Get Weathered

Ok there folks - I do have some new stuff to post, namely I finally finished the Magos' Scyllax bodyguards and built a wee dio for them all to reside in. However, that is going to have to wait as I am actually back in Ireland at the mo (since yesterday) for 2 weeks and I forgot to bring my portable harddrive with me which of course has all my modeling photos - doh!! I put them up anyways once I get back to Korea. 2 weeks without painting or hobbying.......this could be .....difficult!

Anyways - weathering. This post is really not about me or my stuff at all. 'Weathering', just to use it as a general catch all term is something that most painters will use to a greater or lesser degree and with greater or lesser successes. It certainly is a matter of taste as well. Some artists like to go for the full on, uber realistic, gritty, battlefield torn weathering (more towards what I prefer) with mud, rust, corrosion, flaked and ripped metals, grunge, damage and so on, while some prefer the very clean, factory fresh look for their models (not really my thing) but will still want to add a little dust and/or a few minor scratches to the finished piece and many lie somewhere inbetween with their tastes.

Minus' Weathered Barrels

Wherever and whatever floats your own personal Abeyant - weathering is a big thing in this hobby. As I just got back into hobby about a year ago after 10 or 11 years away, I had (and still have) a lot of catching up to do!! And weathering was one of my first....concerns I guess you could call it. I like the weathered finish. I like my figs to have that real look. They are essentially (toy) soldiers of war after all, I want that fluff and background to be represented in the final model. I hit up YouTube initially as there are sooooooo many tutorials there on this very topic. Some are great, some are utter shite, some are quick and easy (with a vast range of final looks) some much longer and more involved. My initial take was - holy shit there is a lot of stuff I need to buy for this. And there are so many different specialist 'weathering' products out there from different companies to get these different effects. Living in South Korea, a huge amount of this is not available to me, even with overseas Internet shopping due to customs regulations, p&p costs and whatnot. Paints and the like are generally (at least by the Korean customs) are classed as chemicals and yes technically they are but that can greatly affect what I can easily or not have sent to me out there. And tbh, I didn't really want to have to buy a enormous amount of extra stuff just for weathering, so I found my own ways. Dakka and the folk there were also a great help for learning new techniques, tips, methods, do's and do not's and so on. And at some point I will probably write down something about my own ways of doing things but not now!!

One of the things I did want for weathering was not having to use an enormous pile of dedicated and specific products. I wanted to be able to do as much as possible from the out with the regular paints that I could get and use for the main painting portion of a product and for me that means GW paints, which I happen to really like and enjoy. I found out that I also have access to all the Tamiya line and some of the Humerol stuff too if I need it in SK. Again, I will cover my own stuff at a later date.
On Dakka I was able to find a lot of really great artists producing effects that I both liked and wanted to learn about and that was invaluably helpful as, for the most part, the painters there are always more than willing and eager to pass on their own knowledge and expertise when asked. That is one of my favourite things about dakka - the painting community and its availability and openness to share the wealth so to speak. One of my favourite artists there is a French guy by the name of 'Minus'. He posts pretty regularly there as well as having his own offsite blog '50 Nuances de Violet;' (50 shades of Purple) - the link to which should be over on the right somewhere in the list of links.  Minus' stuff is top notch. He does a lot of stuff for a game called 'Eden' iirc, a french skirmish game. Minus manages to blend bright popping colours with a great grungy look. Something that is really difficult to do. Trust me I know. I can do bright schemes (ie my Harlequins) or grungy and dark (ie my AdMech stuff) but being able to blend two such approaches together and not have it look like the proverbial dog threw up after eating a box of crayons....is a real talent! Anyways - one of Minus' top skills is in his weathering - from figs, to vehicles to scenery he does some lovely work is always ready to share his methods- trust me I've asked! He's just posted an excellent tutorial over on his blog about how he does it; the above barrels being the test subject for it. It's a definite 'must check-out' for anyone interested in upping their weathering game. One of the things to immediately notice is the amount of different types of materials he uses. It's limited - no need to totally go overboard and buy every type of 'weathering product' out there. Amazing effects CAN totally be achieved with a small, well thought out and correct number of products. He uses just 3 - normal acrylic fig paints, masking fluid and one effect paint. Anyway - I'm tired, grumpy and still aching from travelling so I'm gonna bugger off. Go now and check out this tutorial and learn some awesome new stuff. Laters painters and here's the link  :D


Tuesday, 12 January 2016

Enter The Magos II

Well, here he is. Arch-Magos Cybernetica Braetalan'Kot. Finally got the paint finished up last week and some photos snapped over the weekend Thrilled with how he turned out. Not much else to say as now he needs his retinue. First up am working on his bodyguards - a Scyllax Automata Covenant known as The Arachnae. FW models and should fit in nicely aesthetically with the Arch-Magos. I enjoyed building him so much, I'm gonna build a few lesser models to fit in as his extended retine. Servitor or two and a few wee others.


Just a few photos eh ;) Hope you like him and cheers for looking in. C&C as ever more than welcome

Cheers

Stephen/'Jan'


Thursday, 7 January 2016

Magos' Progression

Last few days have been great for getting stuck into hobby. Gotta love the winter hols! Really buzzing with this Magos.

Something really satisfying about building your own unique fig, seeeing it really come together and then coming to life as the paint starts to go down. Been a fantastic start to the new year! I've got most of the metalwork done now and have been painting kinda from the inside out. The mechandrites really had to be tackled first as they get in the way of everything and as you can see, painting the meant getting metallics on just about all of the Magos' robes so I've had to leave them to last. I wanted his face to be quite recessed within the hood to give a darker and more ominous/sinister look and character to the figure as well ala a lot of John Blanche's visions of the Mechanicus so natually that also needed to be totally painted and finished before the outer robes.
I've stuck to the livery of his Achlys III forgeworld  and the methods/techniques I used on the other members of the forge I've alreasy finished - kats, dragoon, Dominus etc. However, with the Magos, I wanted to step it up a bit so to make him stand out both as being of a higher order and also much older and more senior to the rest of the collected force, even the Dominus techpriest. I needed something the rest wouldn't have. So I settled on his chestplates as been of a more archaic and rare nature. With the rest I use brass as a trim to thier weapons and armour and don't really use any golds. Here I wanted something brassy but a bit more goldy.....So I've gone with what his chestplates and cog axe now are. Comes out as a nice old, tarnished gold effect but still sits will with the ages metals of the mechandrites and the few brass trims. Very happy with how the effect came out and was very easy to achieve. Anyways - this is where we're at the now. Thrilled with how he's coming out.

AdMech Arch-Magos
I've always really like the fluff and aesthetic for the Adeptus Mechanicus/Mechanicum that GW has produced and the work of John Blanche that so often goes hand in hand with it. The FW Mechanicum models (you'll be seeing a fair bit of them coming up in the next few months here) and now the recent GW AdMech releases are all top notch and great stuff to build and paint. Their TechPriest Dominus is probably my favourite character release of 2015. However, for the Arch-Magos, I really wanted something unique and a model that would stand above and beyond the assembled forces. No two Magi are the same and are very much their own creations as they gradually augment and replace their biological parts as they rise up through the ranks and heirarchies down the centuries - becoming more and more mechanical and more and more aloof and even isolated from their peers as they get closer to their god.
And so I looked for inspiration for my Magos and found it from one of the best kitbashers out there - krautscientist and his 'Legion' model. If you haven't checked out his work yet, then do it. He doe some really amazing and inspiring work especially in the realms of the CSM, Inquisition and of course the AdMech. The 'Legion' model uses a WHFB cairn wraith from the hunched robed look so usually associated with the Mechanicum and it works perfectly. As I say, if you haven't seen his work before - go and check it out and be inspired! The 'Legion' model can be found here https://eternalhunt.wordpress.com/2013/04/13/meanwhile-aboard-the-arrke/  but have a look around the whole site.
Anyways - enough from me, time to get back to the brushes!

Cheers for stopping in and all the best for 2016

Jan

Tuesday, 5 January 2016

Enter The Magos

2016 is here and it's time to get some hobby done. Been working on a kitbash/sculpt for an Atch Magos over the last few weeks but with Christmas and that, time has been a bit short. However, finally got the big fella finished....well the build anyways!! Greenstuff parts went on fairly smoothly - those cable rollers are bloody handy! The axe haft was a bit of a pain to imprint a texure pattern on but worked in the end. Pretty happy with the result; bits from about 7 different kits/models went into him. Have a wee guess and see if you can get which ones.
Anyways - here he is - Arch-Magos Braetalan'Kot of Achyls III. Cheers for looking. Paint will be going on as soon as!

AdMech Arch-Magos Braetalan'Kot

Saturday, 2 January 2016

From a Knight's End To A New Year

2016 has arrived!! New year, new projects and undoubtably there will be new models n figs to be bought and painted! First though, in the final days of the old year, I finally managed to finish off the Freeblade Knight - 'The Orphan's Wrath'. Took a fair amount of time overall but can't honestly say I loved every minute - from unboxing to the build to the planning of the overall scheme and livery to the painting adn the final finish. Amazing kit, amazing value and woulkd recommend it to any and everyone. Anyhow... here he is. The last Imperial Knight of the lsot planet of Tiryns - 'The Orphan's Wrath' piloted by the vengeance fuelled Sarpedon!
Freeblade Imperial Knight 1
Freeblade Imperial Knight 3
Freeblade Imperial Knight 2

 And there he is. Am beyond chuffed with how he turned out. Hope you like him. Fully magnetising him was so worth and would recmnd folk do regardless of whether you intend to use him in game or not (I don't even play but still wanted to suck the last drop of marrow out of the kit - lol).

So.......2016 eh?!! I actually made 11 new year's resolutions.......and then realissed that 9 of them are hobby related.....ㅋㅋㅋㅋㅋㅋㅋㅋㅋ But anyway - hope everyone had a great new year's eve and best of luck for the year ahead - paint till you drop!

Cheers

Jan

Thursday, 3 December 2015

Marble-ous ;)

I'm currently working on a WH40K Imperial Knight model. It is, imho, possibly one of the best kits from GW at the mo, both in terms of value, construction and overall enjoyment. When I got it a few months ago, I knew I was going to be taking my sweet time with it - doing a bit, going away to work on other stuff and coming back again. I also decided I was going to magnetise the hell out of it!!! There are so many awesome weapon options included in the kit - it seemed like it would be an exercise in sheer stupidity to just settle on one loadout and consign the rest of the parts to the bits box. Anyway - I have already gone into the magnetisation before here - https://warpbound.blogspot.kr/2015/06/of-knights-and-men.html
and I did a catchup post as to what stage the Knight is at now here - https://warpbound.blogspot.kr/2015/11/wip-catchup-1-colour-of-knight.html

As I mentioned before I'm sure, while I love the 40K, and do stick to it pretty tightly when painting, I also really like to make what I'm painting my own. Thankfully within the 40K 'verse it is very easy to do this. The established Knight Houses and various Forgeworlds are all very good and come with gorgeous colour schemes, iconography and fluff but I wanted to make my own. There are numerous minor Forgeworlds out there which don't get mentioned so coming up with your own is no problem at all and so Achlys Tertius was born. As to the Knights - there is mention in the fluff of the 'Freeblades' - Knight engines and their pilots that have left their respective houses and decided to take to the battles in their own way. Some are cast out for one reason or another, others are lone survivors of planets destroyed, overrun or whathaveyou. Perfect said I!!! My shiny new grey Knight would be a Freeeblade. In that way I had full scope to design his livery, heraldry and own backstory. And so the noble pilot Sarpedon and his towering engine 'Orphan's Wrath' were born!

Now, with that ramble out of the way - on to the purpose and real focus of this post. Marble!
When thinking about and coming up with a colour scheme and livery for 'Orphan's Wrath' I decided on blue (to link with the colour scheme of the Forgeworld Achlys III) and a creamy light beige as I love those to colours used in unison. As the fluff, names and ideas for a backstory for Sarpedon started to form up - it started to borrow from ancient Greek mythology somewhat (not surprising considering my Unversity background) and I decided the cream panels should be done in some sort of marble effect. First thing look at pictures of marble......LOTS of pictures of marble!! Marble is so diverse in type, pattern, colour, makeup and so on you really need to settle on what look you are going for. These are some of the ones that I decided on as the type of thing I was going for
It's a really good idea to assemble a number of examples together and if possible print them out in colour to have on hand for reference while painting.

Now, finding good (any really) marble effect tutorials across the Internet is a lot harder than you'd think. Incredibly hard as it turned out. So after reading what few tip bits I could find I decided to give it a go. Rather nervously I started on 'Orphan's Wrath''s face mask and cowl as a test. Things turned out well and I came up with a method which I was happy with. Of course when I did the initial group of armour plates and weapon shields in this marble effect I didn't think to either write done the recipe, nor the paints I used, nor did I take that many photos. Something that had me swearing a lot last weekend when I went to paint the 2nd load of plates and such and suddenly realised I couldn't remember exactly what paints I'd used not what steps I'd taken. After a few hours of staring at what WiP photos I had, the already finished first batch of plates and a lot of thinking, I managed to piece it together.

This time, I took WiP photos......a lot.!!!!! And also wrote down (and phto'd) the paints used and steps involved!

Ok - so here we go. There are a lot of pics ahead and some 9ish steps but I'll try and go through the whole process in as much detail of what I do as possible.......with lots of pics!!!!!


Marble Paint Palette
I use all Citadel paints but am pretty sure there are equiv. colours in the P3, Val or whatever ranges. It's a pretty limited palette but gives a good range and if you look at the above examples of marble, you can see that marble also has quite a limited palette but a wide tonal variance. I used Ushabti Bone (base colour), Ratskin Flesh (nice orangey tone for the veins, swirls, streaks whathave you into the basecolour), Rhinox Hide (warm, deep brown for deeper edges of the fracture lines and impurities), my old favourite Pallid Wych (I usually use this for lightening warm colours instead of white, here I used it for...well, you'll see), Agrax Earthshade (the master shade! Used here for as a filter and glaze) and finally Seraphim Sepia (used not for shading here but for tracing on the fracture lines) and finally you'll need a mechanical pencil with a light hard lead, 2H or above will do, nothing soft, it leaves too dark a line. Brushes - I used 5. My workhorse - the Winsor & Newton Series 7 #1 brush, the Citadel chisel brush....aka the Large Base brush from their new range (if you don't have this brush...get it. It's a seriously great tool for large open flat spaces) 2 cheap korean brushes - soft, loose bristled watercolour brushes, both size 8, one flat and one round and finally the medium and large Citadel drybrushes, mostly the large one.

White Primed
These are the pieces I'll be doing for this step by step. They're the final batch of bits that need their marble for 'Orphan's Wrath'. Nice variety of big open panels like the pauldrons and down to smaller tighter areas like on the gun shields. The areas for the marble have been primed with the old Citadel White spray which for once behaved itself and didn't give a gritty finish.

Basecoat - 3/4 layers of superthin Usabti Bone
Step 1- Basecoat time - I based with UB using the chisel brush. Great brush and gives a really nice almost brushmark free coat as the bristles are quite densely and neatly packed. You must thin the paint down ever more than usual. Actually this whole marble method uses really really thinned down paint. The UB was thined down to the consistency of milk and then the pieces were given about 4 coats. End result is a lovely thin and streak/brushstroke free basecoat. 4 layers just for a basecoat may seem a lot to some but as you can see from the rivets still poping out, you lose no detail this way.

Basecoat of UB and streaking colour RF
Step 2 - Streaking! Once the basecoat is totally dry, cured whatever - time to have fun! Thin the basecoat some more. Milk consistency at the very thickest - it should be more like a creamy glaze than a layer for the steaking. You can see from the photo how thin it is on the brush. That brush is fully loaded yet you can still see the colour of the bristles a bit. Sorry, should have mentioned - the UB is thinned with 50/50 water and Lahmian Medium. This next stage is wet-in-wet so you need the medium so the paint won't dry too quickly and still retain satuaration even when so thin.
Anyways - first paint on a thin layer of UB and while that's wet, add some Ratskin Flesh to the tip of a UB loaded chisel brush. NOT so loaded that the fething stuff is dripping all over the place mind!! Just like in the above pic. Only a little RF on the very tip of the brush.

Wet-in-wet streaking
Draw the brush across the still wet UB layer. Quickly wash out the brush, dip in your watery UB and draw across the edges of the streak. Just the once really. The big thing here is to not overwork the streak. Otherwise it'll just mix into the basecoat and you'll lose the nice streak. What you're aiming for you can see in the pic above and then dried below.

Wet-in-wet streaking
The most important thing here is letting the streaks melt slightly into the basecoat colour but still retaining some of their definition. That make sense ok?!

Sponging with a basecoat and RH mix and then washing
Step 3 - The first of the stressy steps. Adding some impurities. Marble often has odd mineral impurities which give it part of its distinctive look. I went for a warm brown colour for this as it fits in well with the colour palette we've already put down. I did try black and red as well but they just didnt look right. Anyway - tools to use - torn up sponge and a soft loose bristled large flat brush. Not a tight dense brush as they are too stiff and won't wash the paint off so much as scrub it off.

Sponging done
First up load the Dip the sponge in some nice thinned UB and then into some unthinned Rhinox Hide. Dab on some kitchen towel to get some of the excess paint off and to ever so slightly mix the two colours. Dab the sponge a little more heavily than you would if you were using a sponge to show chipping/weathering. You'll get some nice splotches and patterns. Let them dry just a little (I just counted to 10) and then with your water brush, wash across the panel in the direction of the streaks to remove the excess paint.

First filter - AE watered down
Step 4 - Next I add a filter to bring all I've done so far together a little. Step forward Agrax Earthshade! For a filter we wnat this watered right down - I think I went about 1 part AE to 3/4 parts water. Give what you've done so far a nice thin wash of the AE but don't go all floody floody on it. The AE here is being used not to show depth or shade any recesses but simply as a homogenising filter......or is it glaze....??? Meh - whatever - you get the idea

Pencil on the veins
Step 5 - Time to get those lovely distinct marble lines on. Before you do this - STOP!! Go look at some pictures of marble over a nice cuppa for 10 minutes. Look at the way the lines in marble work, how they grow and travel. They roughly go in the same direction as the streaks and grow like roots. They never just stop dead but keep going - connecting and intersecting with each other. With all that in mind - use the mechanical pencil to lightly draw the lines; see the way they travel around and almost frame some to the darker streaks at times? Do that. Pay attention to that lovely base scheme you now have in place. And relax - let the lines grow and develop. If you fuck up....top of the pencil...there's an eraser :)

Painting the veins with SS
Step 6 - Over halfway there. Out comes the W&N. I used a #1 as it holds more shade but still has a really fine point. Using a fine tipped brush, trace over all the pencil lines with Seraphim Sepia.You may need to go over some lines twice but don't make them too too dark.

Veins then strengthened at intersections and the edges with SS + RH
Once that is done and dry, mix some Rhinox Hide with SS to thin it down and where the lines intersect, at the edges of the piece you're marbling and where the lines are hard to see due to a deeper base area go over them again with this RH/SS mix to deepen and strenghten the lines and give a tonal variety. As you can see from the real marble pics above, these lines in the marble vary greatly in depth and strength so you want to include this element into your effect too. The above is where you should be now. This is a very strong look and you could stop at this stage but I wanted a slightly softer more subtle effect so onto that.....

Powderbrushing time
Step 7 - Ok. Stressy Step #2. To tone the whole thing down I tried using a white (well Pallid Wych) glaze....nope. Did not work at all. So I thought about drybrushing. This step is not so much drybrushing as ....powderbrushing I call it.

Dryer than drybrushing.
Load up a medium or better still a large drybrush and really pound away on some kitchen towel. The paint needs to be way dryer than you would normaly have it when drybrishing some details on a fig. I test it out on my hand to see if it's dry enough and powdery enough yet. Drybrushing usually is picking out raised details but here there are no raised details. The powderbrushing is to basically add another layer which tones down and softens the marble while letting some of the streaking adn veins show through.

Lightly lightly
Really dry that paint out and work in into the bristles so it will brush off in more of a powder form than a paint if you get my drift. Brush quickly but lightly (think of some one putting that powdery makeup on...whatsitmacalled.......you know the stuff they dust on with a big brush......ah -whatever it's called, you get the point.....BLUSHER.....that's the stuff.....anyway) keep lightly dusting and brushing over the surface and as you can see above thats the effect you're looking for. As you do this there should be paint dust flying off the piece. No dust.....it's not dry enough and as it is a flat surface you end up getting nasty streaks which you really don't want.

I said LIGHTLY!!!


After letting the powderbrushing dry totally - steal the wife's makeup brush!
So, with all the powderbrushing done. Go make another cup of coffee and let the powder totally cure. I left it for about an hour just to be totally sure. The gently brush everything with a clean makeup brush like above. You want the longest, softest bristled brush you can find. Brush everyhting to get rid of any loose paint particles. You need everything cured and clean for .....

Final glaze/filter
Step 8 - Final glaze. 1 part AE, and equal parts lahmian and water. Should be thin enough to add light tint to the overall mable, deepen the edges but not make everything dark again. The glaze will also seal the powderbrushing in.

Step 9 - Final step, nearly there - waheey!!! Mix equal parts(ish) RH, SS and water for a final line/vein touchup. Go back over any of the lines that have faded too much or that you want to emphasise a little more. Don't overdo these accents though. Keep the mix light and don't do too many. The photo above actually makes them look way darker then they really are.

Viola
And there we go. Done. I went with a nice twilight blue as the opposing colour on the pauldrons and tilting shield here to complement the soft cream marble. Well, I hope that that a) made sense to folk and b) will be of some use to others. Any questions, comments etc please do hit me up in the comments below.

Happy marbling


Jan :)


Kats-Be-Done!

Kataphrons Destroyers finally all done. Fantastic figs but, like most of the new GW AdMech are really intircate, fiddley and highly detailed. That is not a complaint - I love all the extra detail. The sculpts are gorgeous but do require an extra element of patience, esp in the builds. I finished building a squad of Skitarii Rangers and they are just a normal squad but still so highly detailed and a touch fiddly. Gonna look awesome when I (eventually) get 'round to painting them up. The King of fiddley has to go to the Sydonian Dragoon though - holy feth that thing was somethign else to put together!!! Yeah......I want another one!

AdMech Kataphron Destroyers

AdMech Kataphron Destroyers

AdMech Kataphron Destroyers

AdMech Kataphron Destroyers

AdMech Kataphron Destroyers

AdMech Kataphron Destroyers

AdMech Kataphron Destroyers

AdMech Kataphron Destroyers


Anyways - here's the squad of Kats. The lead one has a command carrier platform and I jumped ahead and painted the Alpha of the Skitarii Ranger Squad to ride along. Hope you like them :D

Jan